A few nice plastic machining company images I found:
Whirlpool Duet ghw9150 or Kenmore
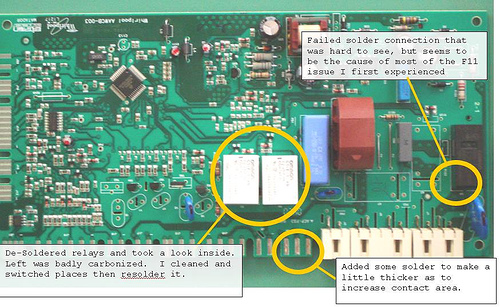
Image by mysteryonion
F11 Syndrome on Whirlpool and Kenmore
TO MY FELLOW "F11 Syndrome" Sufferers (edited again to be more readable)
It start like this:
In fall 2005 or two months after the warranty crapped out was when it started its problems for us. We called the Whirlpool support (hah) number and the person said later “it’s fine”. I said you had to put a load in and see it throw the code. Later, motor error and DL "you will need a new motor and wires 0"…you know the rest. Lucky thing I was too cheap to play the pay game. My wife still likes the machines… so… I had to get it fixed. Surfing for answers and based on other folk’s accounts and details (see below) up and down the web. They described the same symptoms.
NEW UPDATES: FRETTING/oxidized connections Read further below.
DISCLAIMER NOTE: THE EXTRA SOLDER NOTED ABOVE WAS DUE TO MY ORIGINAL TRIAL AND ERROR OF CLEANING AND PRODDING. EXTRA SOLDER MAY DISTORT OR DAMAGE THE CONNECTOR, PLEASE READ OTHER INFORMATION POSTED BY OTHERS…thank you.
Having nothing to loose:
You will see the yellow circles where found signs of problems for the solder work suggestions as described on the net.
Semi Legal Mumbo-Jumbo…(skip to next section otherwise read):
The following information is only an individuals (my) experience with a particular product and in no manner should it be construed as a statement of universal fault of the product nor does the information within this article guarantee that you will achieve the same results. Following the advise or examples found here will be at you own risk and damage is possible if you are not familiar with basic procedures. The author does not cover any damages if you fry your control board… Individuals are reminded that you should not mistake any overtones as a condemnation of the particular product or in any way does it make any accusation towards a company’s lack of responsibility towards the quality of the product and is in fact a condition that is normally outside the warranty of the machine and is therefore the responsibility of the owner for any and all expenses toward repairs (we are on our own) and such that statements are personal observations and are not substantiated by formal data published…blah…blah…blah… Ok, the ugly part is done for now…
…Look, if you have the F11 problem, the following information may void your warranty… not that any of us had this happen while under warranty… exercise caution and care… OH! AND UNPLUG YOUR MACHINE BEFORE YOU MONKEY AROUND INSIDE IT!!!
Also, IN RESPONSE TO SOME REMARKS (a DIY forum and about me)…
IT IS TRUE… I AM NOT AN APPLIANCE REPAIR EXPERT…(nor do I play one on television), I AM A DUET OWNER AND HAVE HAD THIS HAPPEN TO ME. I AM SHARING SOME OF THE INFORMATION I FOUND AND OR RECEIVED… NOTHING MORE… NOR, DO I WANT ANYTHING IN RETURN. (though I am curious about how old was your machine when it happened, so do share that in the comments if you don’t mind… thank you)
Getting a Manual:
Look for Whirlpool publication L-68 in pdf form and download before its gone
( secured.whirlpool.com/Service/SrvTechAdm.nsf/2cd44500d572… ).
follow info on getting in machine. Also, note when you are prying out the ccu board, be careful as the plastic is brittle (cheap). I’ve snapped off a few bits here and there thanks to my rush so be a little prepared.
DIY-desoldering & SAFETY note:
You should have safety glasses on to perform the following… It is easy to do soldering yourself. A can of compressed air is necessary (safety glasses) and the trick to blast the solder off while its molten Try a solder sucker instead (caution: lead based solder, so don’t breath in smoke and this is not recommended if you are pregnant or guys must be careful or you may start firing blanks). Heat the contact point of whichever component and as it shine up in the molten state, give it a quick blast (not at yourself, away from others and things and pets).
Dealing with the RELAY switches:
Consider one of your missions is towards the relays. It’s hard to see in my picture above, but my example is with 2 – OMRAN G5LE-1-VD in the white and 1 OMRAN G2RL-1A-E relay in black since we don’t have a heater so two spot are left empty. (if viewing in member flickr mode, additional notes are listed). When you desolder them off the board it is easier to pull the covers off and it takes just a slight pinch their tiny latches. Getting inside will allow you to clean the contact points if not replacing. I also swapped the two relays for each others position. Allowing the less carbonized one to sit in the hot seat for a while, this is mainly why I desoldered them off. Again, solder them back in with a good silver solder and don’t overheat. If you are able, do replace them both with new ones. Update: See below from "CJRECHE" about different relays and higher amp rating.
DIY soldering:
When re-soldering, use a good silver/tin solder instead of the cheap lead/tin crap they used. It’s a soldering temp of 370+ degrees so careful! I purchased a Radio Shack 15-30 watt iron and it worked fine for me. Butter the tip a little and use a damp sponge to clean off any sludge from the rosin/flux burning. The tip would be then ready to touch the area for soldering. Not a dainty touch, but enough to allow heating up the connection to melt the fresh solder from the spool as you touch it to the heated area and don’t over do it. Just enough to cover.
Additional Error notes:
My Door Errors and Motor Errors can be traced back to the same point in the CCU. Mostly nothing moves without the ccu involved in the process. So it would not be a surprise if the repair guy misdiagnoses and repairs the problem Door or Motor and you still have the same issues. Useful is to beef up the solder coated contacts as circled above. This cuts down on the chance of vibrations wiggling off those flimsy plugs.
Other things that cause trouble over time:
RF connection gets loose or slightly corroded and that sends shivers up the CCU too.
Door wire harness at the door end gets a little wiggly
Scraping from the drum (serious problem see Spider Bracket)
Passing along more info:
If you know more about the different components on this board beyond this little soldering subject, please keep me up to date if it is part of the problem. Such things like poor quality parts and suggestion for better… that sort of stuff. Also if you have other sites that have more info on the subject, pass them on so I can include them here. Otherwise, I hope some of this helps. I’ve heard talk in the past that Sears will replace the boards on Kenmore washers…good… take them up on it if its free or near free! Whirlpool…I’ve not heard a thing yet.
Special Thanks:
Thanks to the others whom have done the trail blazing of diagnosing the cause and posting the solutions "crabboy","kevintrisha" and "Sonnysideup" Also read "Littleman23" on the epinion message board he seems to have more info for disassembly. Hey, check out "tanksalotcs" "SPIDER BRACKET"…’youtube’ under kenmore, front loader washer, subject is spider bracket failure! Also, Special-Special Thanks to CJRECHE for his efforts and cool microscope images. Special-Special-Special thanks to MONETTSYS for his facts and links (see below).
History to date:
Number of Loads since repaired in April of 2007:198 loads as of January 2, 2008 with no problems. Now 400ish loads and a year has passed since completion of repair. I hope all you other f11 sufferers are having luck with some of the info above. If it has not happened to your machine yet, hope it never will.
Update:
03/16/2009 – still no problems since my solder job (440+ loads).
10/12/2009 – still no problems and about 500ish loads.
04/20/2010 – still no problems … lost count 550?